Create a Teams Chatbot with Copilot Studio – How to Use AI Agents Directly in Your Company
With Microsoft Copilot Studio, you can build your own Teams chatbot in just a few minutes—without writing a single line of code. The completely redesigned interface makes getting started in…
RSRalf SchukayUpdated Jul 7, 20268 min read Human reviewed
✓ ReviewedLast updated July 7, 2026 by Ralf Schukay
With Microsoft Copilot Studio, you can build your own Teams chatbot in just a few minutes—without writing a single line of code. The completely redesigned interface makes getting started in 2026 easier than ever: Create an agent, write instructions, select skills and tools, and publish to Teams. Done.
Part of our AI Agents Guide. For the full picture, see our complete AI Agents Guide.
What can Microsoft Copilot Studio do?
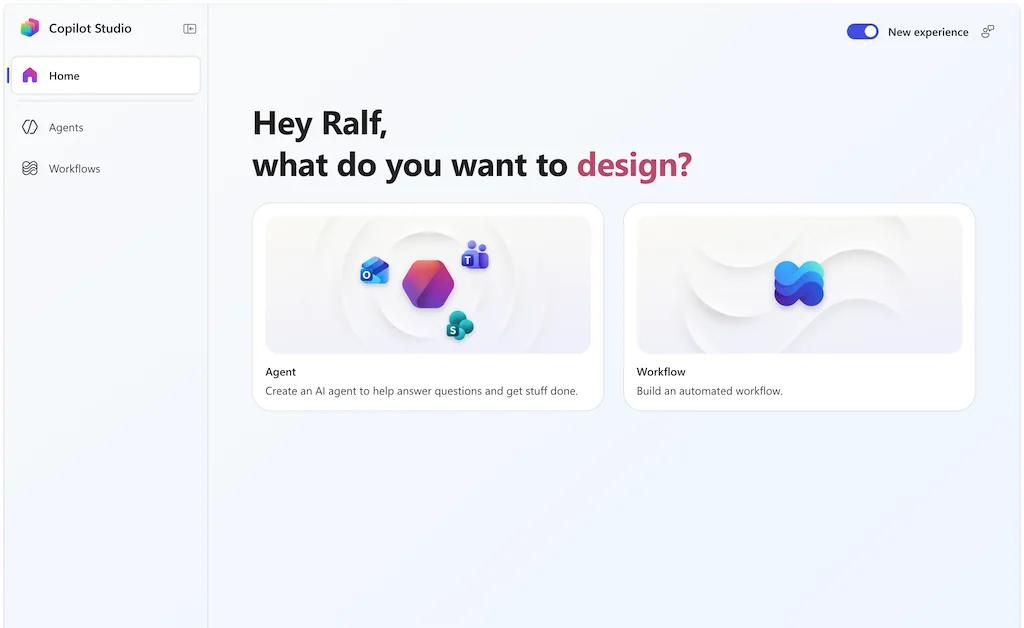
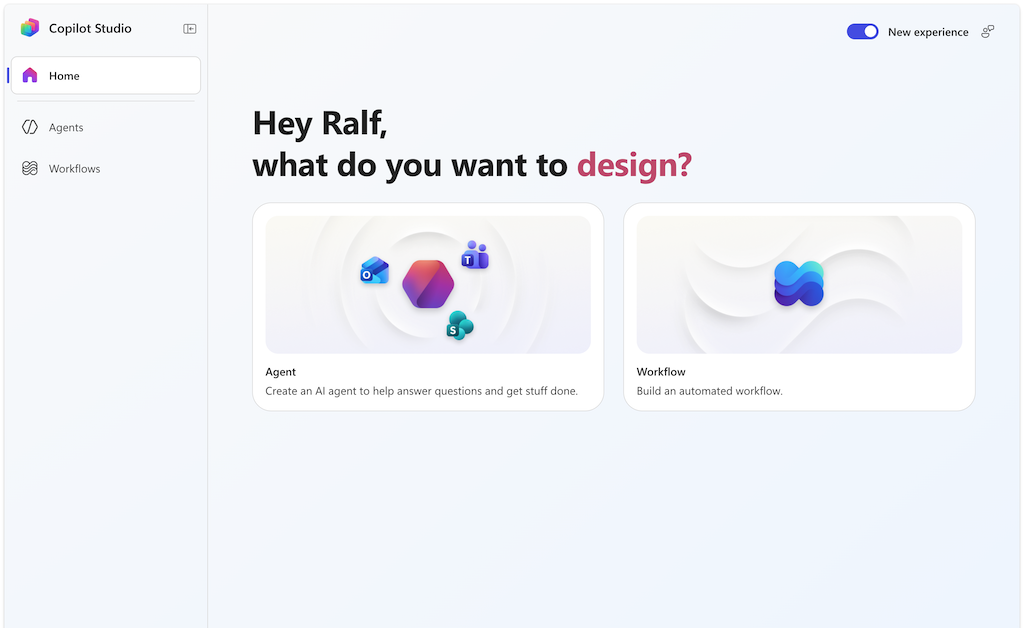
Microsoft has transformed Copilot Studio from a chatbot builder into a complete agent platform. The new interface is greatly simplified, making it easy to get started with agent creation in your organization. The new sidebar is divided into: Home, Agents, and Workflows.
The new Copilot Studio homepage: Agent or Workflow—that’s all you need.
Here are the most important new features in Copilot Studio:
Skills: Reusable instruction packages that you define once and integrate into multiple agents.
Microsoft IQ / Work IQ: Brings work context from Microsoft 365 (emails, meetings, files, chats) directly into your agent.
Memory (Preview): The agent remembers interactions and context across conversations.
Free model selection: In addition to GPT-5, Claude Opus, Claude Sonnet, and other models are available.
New agent types: Workflow agents, Connected agents (agent-to-agent protocol), and Computer-Use agents that independently operate web and desktop apps.
You’ll need a Microsoft 365 Business account and access to Copilot Studio. The entire process takes less than 30 minutes—here’s an overview of where to find everything.
Step 1: Create an agent
On the home page, choose between two cards: Agent (an AI assistant that answers questions and performs tasks) or Workflow (an automated process chain). To create a Teams chatbot, start with an Agent.
Step 2: Instructions, Model, and Knowledge
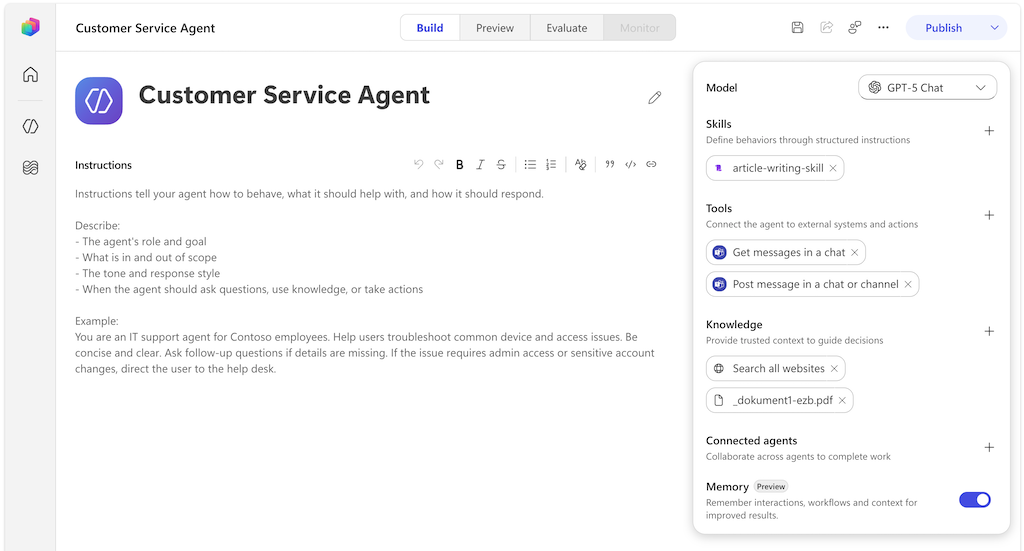
The new Agent Editor displays the Instructions on the left and all your agent’s building blocks at a glance on the right. At the top, you can switch between Build, Preview, Evaluate, and Monitor —building, testing, evaluating, and monitoring all in one window.
The Agent Editor: Instructions on the left, Model, Skills, Tools, Knowledge, and Memory on the right.
In the Instructions section, you describe in plain German (or English) what the agent should do: role, scope of responsibilities, tone, and when it should ask for clarification. To the
right
of that, you’ll find:
Model: The AI model behind the agent, e.g., GPT-5 Chat or Claude.
Knowledge: Websites, SharePoint, documents, or PDFs as a knowledge base—the agent answers questions directly from your sources.
Connected agents: Other agents to whom your chatbot delegates tasks.
Memory: Use the toggle to enable memory for interactions and context.
Step 3: Add skills
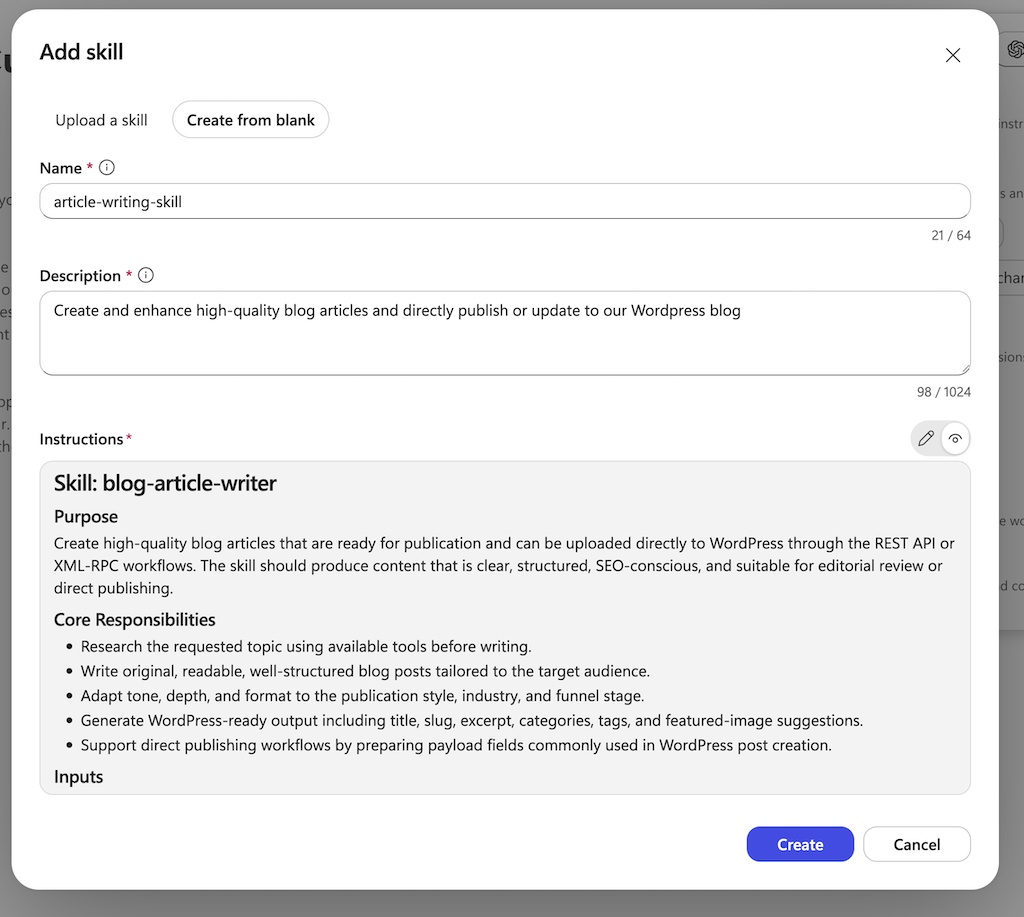
Skills are the most exciting new concept: structured sets of instructions with a name, description, and detailed steps. Instead of cramming everything into one huge prompt, you encapsulate behavior into individual skills—such as an “article-writing-skill” that precisely defines how blog articles are researched, written, and formatted.
Create skills: Either upload them or create them directly in Copilot Studio.
You may be familiar with this principle from Anthropic’s Claude Skills —Microsoft is following the same trend here: define knowledge and behavior once, reuse it everywhere.
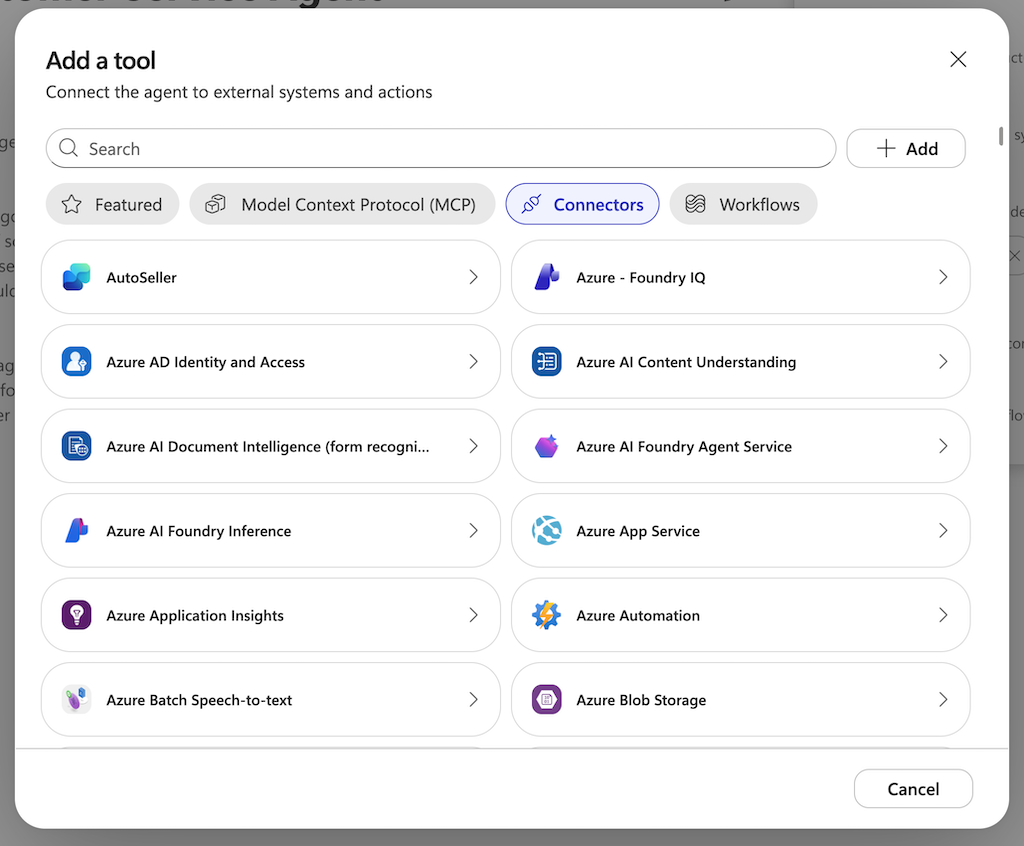
Step 4: Connect Tools and Connectors
Under “Tools,” you connect the agent to external systems. The dialog is divided into categories: Featured, Model Context Protocol (MCP), Connectors, and Workflows. The selection is huge—ranging from Azure services to SharePoint and Outlook, all the way to third-party providers like Dropbox or Google Calendar.
Add tools: MCP servers, hundreds of connectors, and custom workflows are available.
Particularly relevant for a Teams chatbot: Microsoft Teams tools such as “Get messages in a chat” or “Post message in a chat or channel.” This allows the agent not only to respond but also to actively participate in chats and channels.
Step 5: Test and publish to Teams
Use the Preview tab to test the agent directly in the chat window. If everything works, click Publish in the top-right corner and select Microsoft Teams as the channel. The chatbot will then appear as an app in Teams—for you, your team, or the entire organization. Use “Evaluate” to check the quality of responses using test sets, and use “Monitor” to keep an eye on ongoing operations.
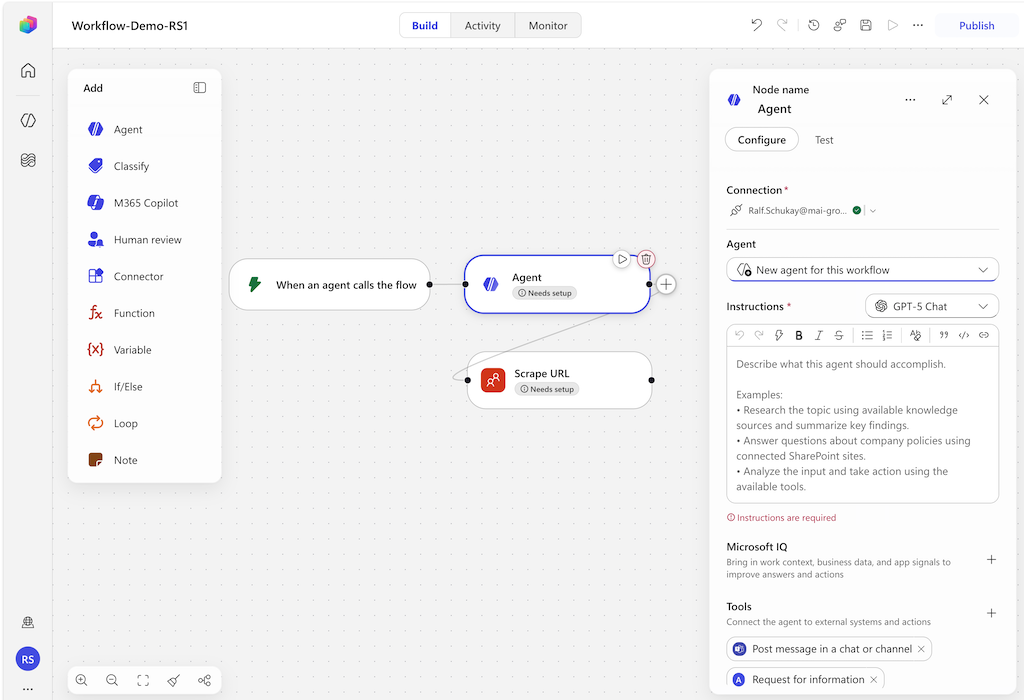
Bonus: Workflows—Automation with Agent Nodes
The second major component of the new interface is Workflows: a visual editor where you can build automations by connecting nodes—similar to n8n workflows, but entirely within the Microsoft ecosystem.
The workflow editor in Copilot Studio: Agent nodes with their own instructions, model selection, and Microsoft IQ.
On the left, you’ll find the node palette: Agent, Classify, M365 Copilot, Human Review, Connector, Function, If/Else, and Loop. What makes it special: Each agent node is a full-fledged mini-agent with its own instructions, model, and tools. Using Microsoft IQ, you can bring work context and business data into the node; with Human Review, you can incorporate human approvals into the process.
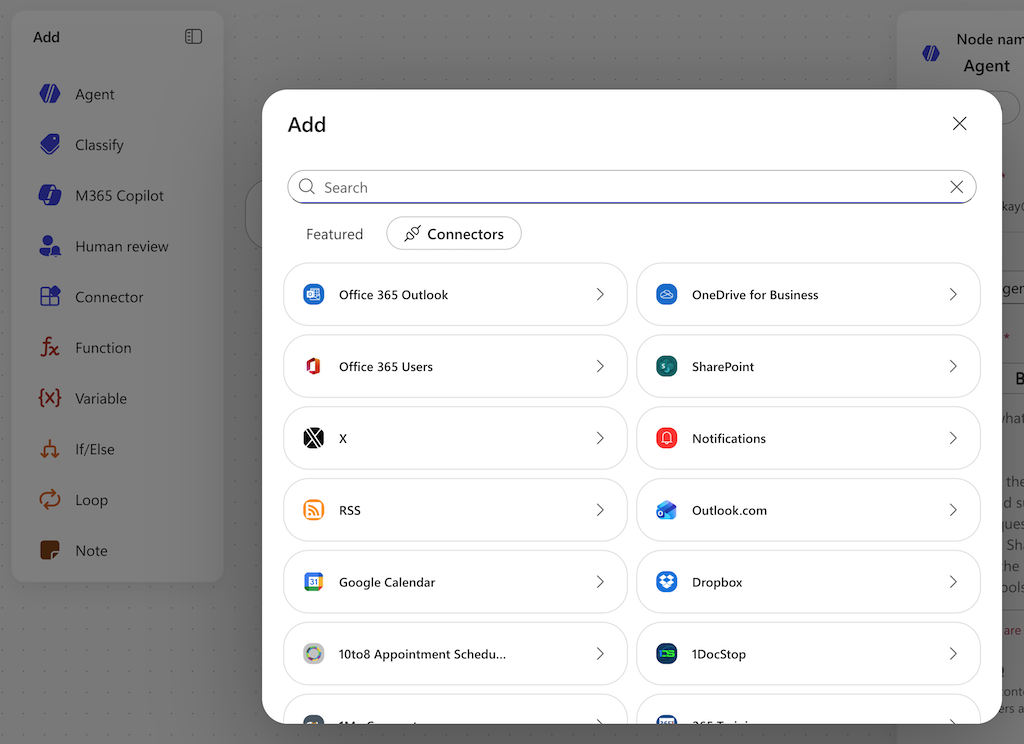
Connectors in the workflow: From Office 365 and SharePoint to Google Calendar and Dropbox.
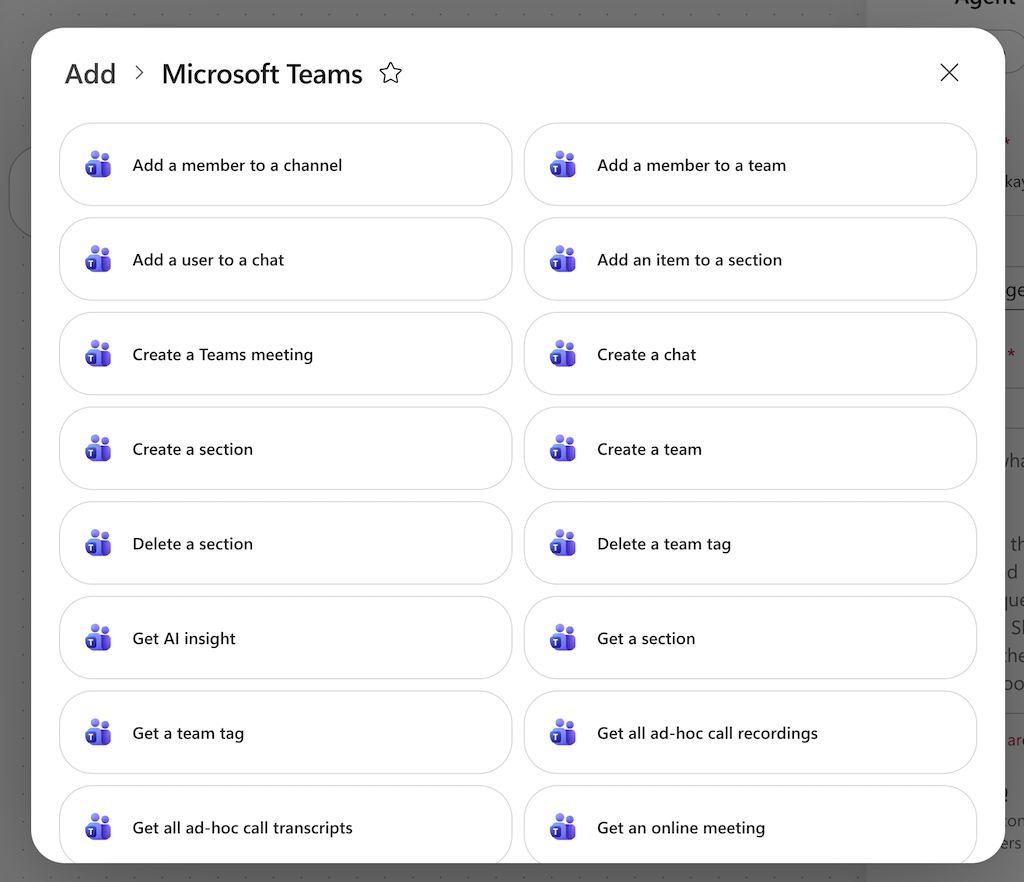
Teams is deeply integrated here as well: The Microsoft Teams connector comes with dozens of pre-built actions—create meetings, start chats, manage members, retrieve AI insights, or read call transcripts.
The Teams connector: Pre-built actions for chats, meetings, channels, and transcripts.
A typical scenario: A workflow monitors incoming requests, a Classify node sorts them, an Agent node automatically answers standard questions and posts the response to the correct channel via the Teams Connector—critical cases are routed to a human for review. If you want to dive deeper into the topic: In our guide “Build Your Own AI Agents,” we explain the basics.
How much does Copilot Studio cost?
Microsoft charges in Copilot Credits, no longer per message. Key details:
Capacity Pack: 25,000 Copilot Credits for $200 per month (pooled tenant-wide, not per user).
Pay-as-you-go: $0.01 per credit via Azure—ideal for getting started without fixed costs.
Microsoft 365 Copilot: If you have a Copilot license, you don’t use any additional credits for internal agent interactions.
Pre-Purchase: A pre-commitment offers up to a 20 percent discount.
The number of credits a response costs depends on its complexity—simple responses are inexpensive, while autonomous actions using tools cost more.
Benefits of Copilot Studio for Businesses
Copilot Studio offers several advantages over other AI chat systems for businesses working within the Microsoft stack:
Native Teams integration:
Simply configure Copilot via the web interface, click the “Publish” button, and you’re done—no other tool brings chatbots so directly to Microsoft 365 users.
No-code solution with professional options:
For beginners: You simply provide your chatbot with “instructions” in everyday language. This allows you to quickly create a chatbot within your company’s environment and share and use it with colleagues. Hundreds of connectors let you integrate with your own systems; for example, Copilot can quickly create a Jira ticket, read and edit a Confluence page, create a ServiceNow ticket when a customer inquiry comes in, and much more.
For pros: If needed, you can even enhance your Copilot with MCP servers, your own Functions, and VS Code extensions. This makes it even more powerful and allows it to integrate with other systems
Free model selection:
GPT-5, Claude Opus, Claude Sonnet, and other models are available. Depending on your AI budget and the desired quality of the AI results, you can choose a suitable AI model to influence quality, speed, or cost.
Microsoft IQ / Work IQ:
Work IQ provides access to all documents from the work context—such as emails, meetings, and files—a capability that no external chatbot tool has or is allowed to have, and which is the unique selling point of Microsoft’s solution.
Built-in governance:
Entra Agent Identities, audit logs, agent inventory, and analytics—essential for enterprise deployment.
Scalable agent architecture:
Connected agents, the Agent-to-Agent (A2A) protocol, and workflows scale to meet the company’s growing needs.
For those who prefer to build automation outside the Microsoft stack: n8n remains our recommendation for flexible, self-hosted workflows.
FAQ: Microsoft Teams Chatbot with Copilot Studio
How much does a Teams chatbot with Copilot Studio cost?
Copilot Studio costs $200 per month for 25,000 Copilot credits (tenant-wide) or $0.01 per credit on a pay-as-you-go basis. Users with a Microsoft 365 Copilot license do not consume credits internally.
Do I need programming skills?
No. You write instructions in plain language and add skills, tools, and knowledge with a single click. For advanced users, there’s MCP Server, Functions, and a VS Code extension.
What’s the difference between an agent and a workflow?
An agent is a chatbot that responds to questions and performs tasks. A workflow is an automated process chain consisting of nodes (Agent, Classify, If/Else, Loop, etc.) that is triggered by events. Both can be combined: Agents can trigger workflows, and vice versa.
Can I still build classic Teams chatbots?
No. As of the end of June 2026, you can no longer create Classic Bots in the Copilot Studio Teams app. You’ll build new chatbots using the new Copilot Studio interface and publish them to Teams.
Which AI models can I use?
By default, GPT-5 Chat, as well as Claude Opus and Claude Sonnet (generally available), and experimental options like Mistral. You select the model per agent—and in workflows, even per agent node.
The new Copilot Studio interface is a real leap forward: Instead of clicking through topics and trigger phrases, you simply describe your Teams chatbot in instructions, add skills, tools, and knowledge—and publish it directly to Teams. With workflows, Microsoft IQ, and free model selection, Copilot Studio 2026 is a full-fledged agent platform that can hold its own against any competitor.
Getting started costs almost nothing with pay-as-you-go—so go ahead: Create your first agent, connect it to your SharePoint, and send it to your team. Let’s get started!
Ralf Schukay ist Co-Gründer von AI Rockstars und spezialisiert auf AI-Automatisierung und Enterprise-Lösungen. Er testet und vergleicht KI-Tools für den professionellen Einsatz und hilft Teams, mit Workflow-Automatisierung produktiver zu arbeiten.
To provide the best experiences, we use technologies like cookies to store and/or access device information. Consenting to these technologies will allow us to process data such as browsing behavior or unique IDs on this site. Not consenting or withdrawing consent, may adversely affect certain features and functions.
Functional
Always active
The technical storage or access is strictly necessary for the legitimate purpose of enabling the use of a specific service explicitly requested by the subscriber or user, or for the sole purpose of carrying out the transmission of a communication over an electronic communications network.
Preferences
The technical storage or access is necessary for the legitimate purpose of storing preferences that are not requested by the subscriber or user.
Statistics
The technical storage or access that is used exclusively for statistical purposes.The technical storage or access that is used exclusively for anonymous statistical purposes. Without a subpoena, voluntary compliance on the part of your Internet Service Provider, or additional records from a third party, information stored or retrieved for this purpose alone cannot usually be used to identify you.
Marketing
The technical storage or access is required to create user profiles to send advertising, or to track the user on a website or across several websites for similar marketing purposes.