Claude Code is getting a new feature with the /design command: Right in the terminal or in the desktop app, you can generate multiple UI designs, compare them on claude.ai, customize your favorite one, and then have Claude Code build a real frontend from it.
Part of our Claude AI Guide. For the full picture, see our complete Claude AI Guide.
Claude Code /design: What’s behind the new command?
Anthropic product designer Nate Parrott announced the /design command on August 18, 2026, as an early preview. The command brings the canvas technology from Claude Design—Anthropic’s separate design tool, which launched in April 2026—directly into Claude Code. The feature is currently available for Claude Code Desktop and CLI.
The basic idea: Until now, Claude Code has typically written code directly for UI tasks without first coordinating colors, layout, and hierarchy. This led to rework if the result wasn’t right. With /design, a separate design artifact is created between the requirement and the code—one that you can compare, modify, and only then approve before a single line of production code is written.
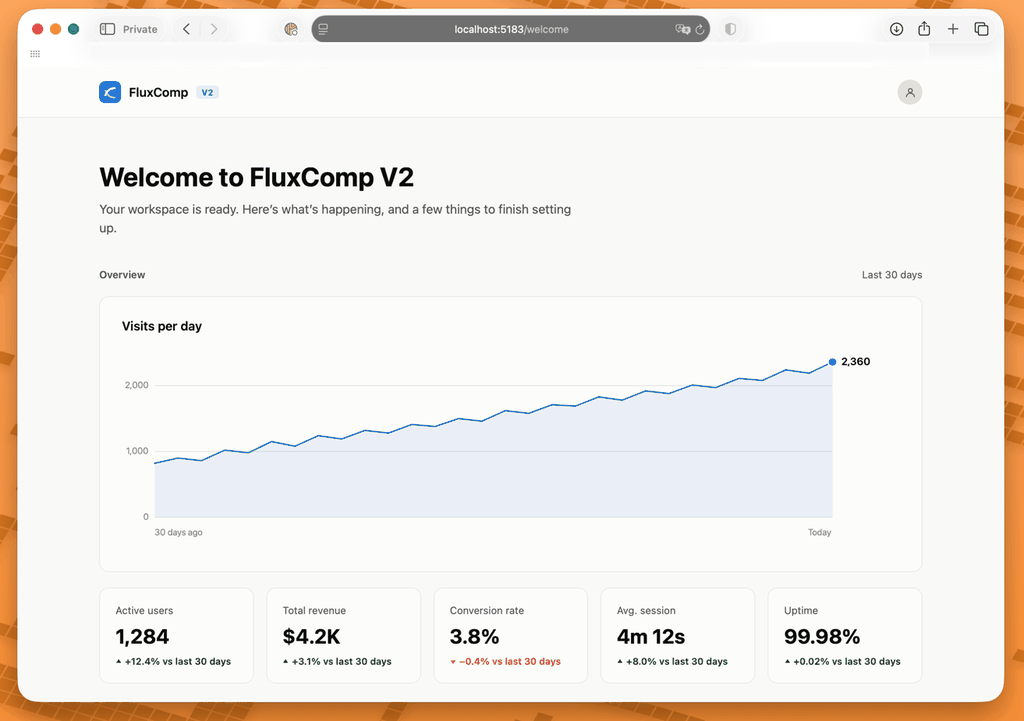
The following example shows how this works in practice: a price calculator for a website and a second page for a fictional SaaS product called “FluxComp V2”—from the first sketch to the finished front-end code. We will build this application welcome page:
Step 1: Initiate the first draft with /design
The command starts with a brief, vague description—you don’t need pixel-perfect specifications:
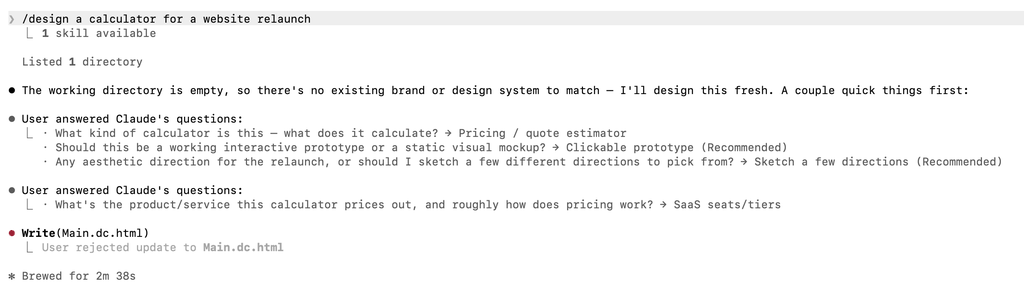
/design a calculator for a website relaunch
Claude Code then asks specific follow-up questions instead of jumping right in: What should the calculator compute (in this example: a price/quote calculator)? Should it be a clickable prototype or a static mockup? And should Claude suggest multiple design directions, or is there already a specific direction in mind? In this example, the choice was a clickable prototype with several design directions to choose from.
Step 2: Compare multiple design directions in claude.ai
After addressing the follow-up questions, Claude Code publishes the draft as an artifact and provides a direct link to claude.ai, where the result can be opened and edited.

In this example, there are four distinctly different styles for the same price calculator: a minimalist, editorial layout; a data-rich dashboard with a dark sidebar; a dark, technical terminal design; and a warm, playful consumer version. All four calculate in real time using the same sample data (12 team seats, annual billing), but demonstrate how differently the same function can appear.
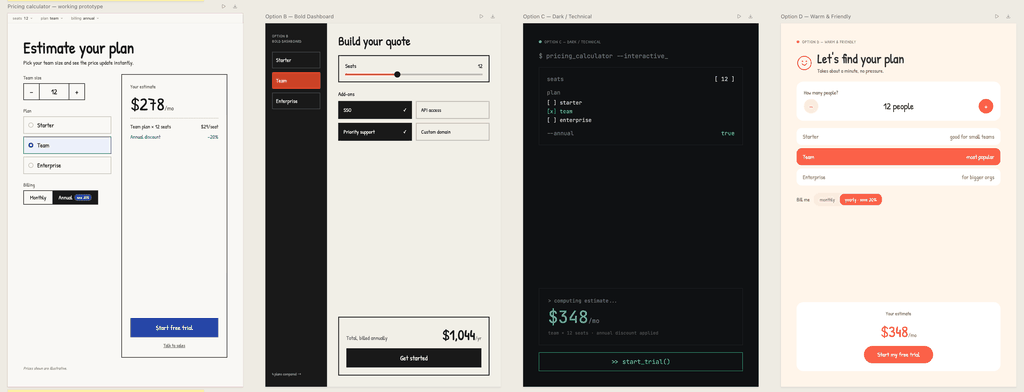
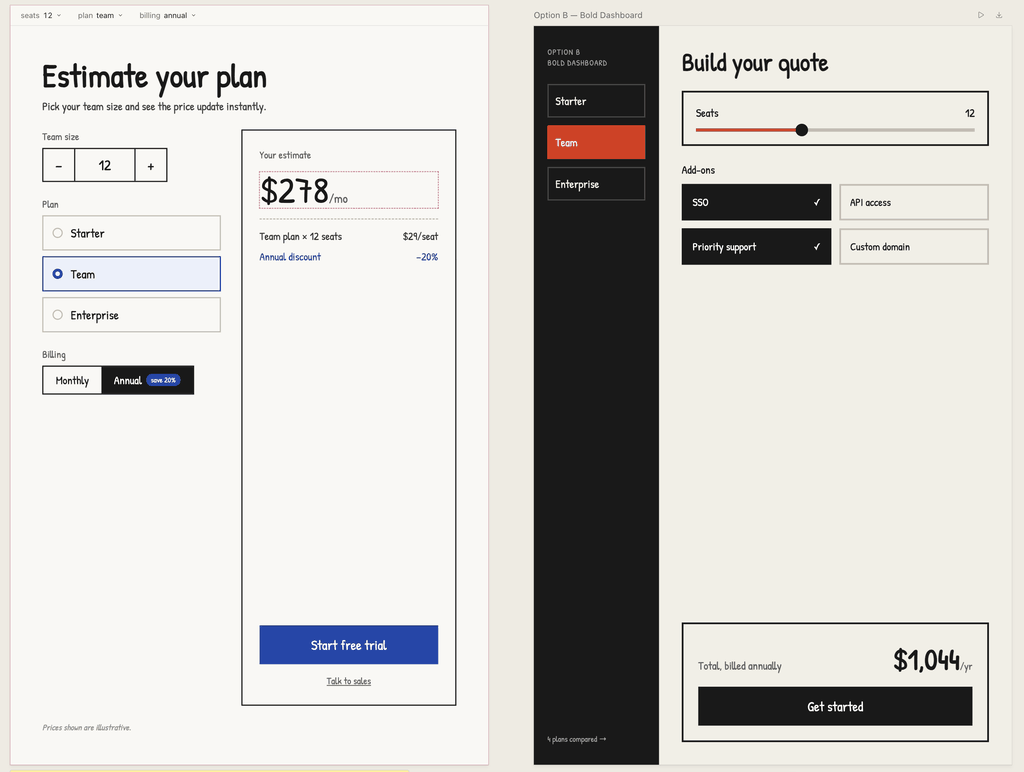
Instead of committing to a specific style early on, you can view all options side by side at this stage and make an informed decision before any code is written for the final version.
Step 3: Build a second page with another /design command
The /design command can be continued directly within the same session. In the example, a second command follows, describing the page that appears after submitting the price calculator—a welcome dashboard page for the fictional product “FluxComp V2” featuring a visitor chart and five KPI tiles:
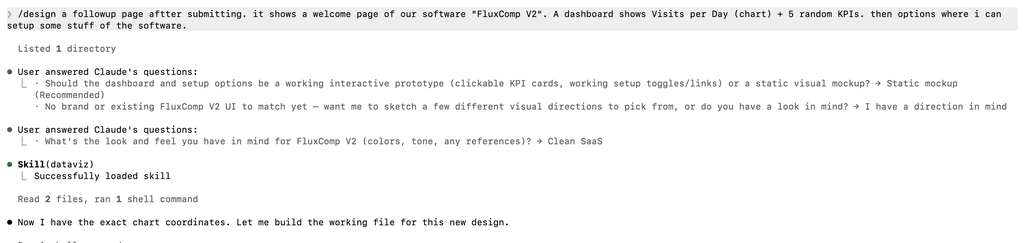
/design a follow-up page after submission. It shows a welcome page for our software “FluxComp V2.” A dashboard displays visits per day (chart) and 5 random KPIs, followed by options where I can configure some software settings.
Here, too, Claude Code asks specific questions: Should the dashboard be interactive or a static mockup (in the example: static mockup), and is there already a brand or UI that Claude should use as a reference? In this case, a “clean SaaS” look was specified as the direction.

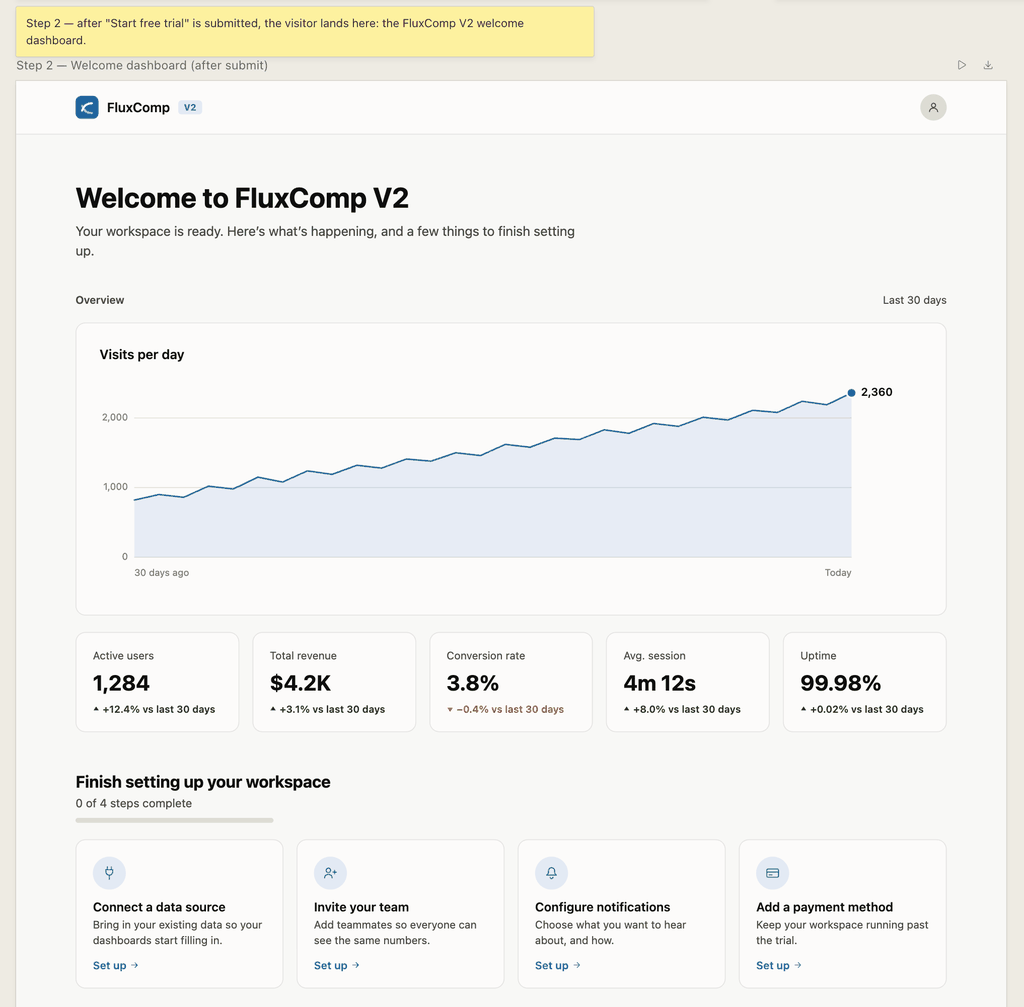
The result: a welcome page with a logo bar, welcome text, a “Visits per day” chart, five metrics tiles (active users, revenue, conversion rate, average session duration, uptime), and an onboarding section with four setup steps.
Step 4: Build a real frontend from the mockups
Once both design artifacts have been approved, the actual purpose of the feature follows: implementing it as production-ready code. A simple follow-up command is all it takes:
build the frontend for both pages (pricing, dashboard)
At this point, Claude Code asks an important question before generating production code: Which frontend stack should be used? In the example, the options were React, Vite, TypeScript (recommended, modern dev setup, component-based), Next.js (React with built-in routing), plain HTML/CSS/JS without a build step, or any other stack of your choice.
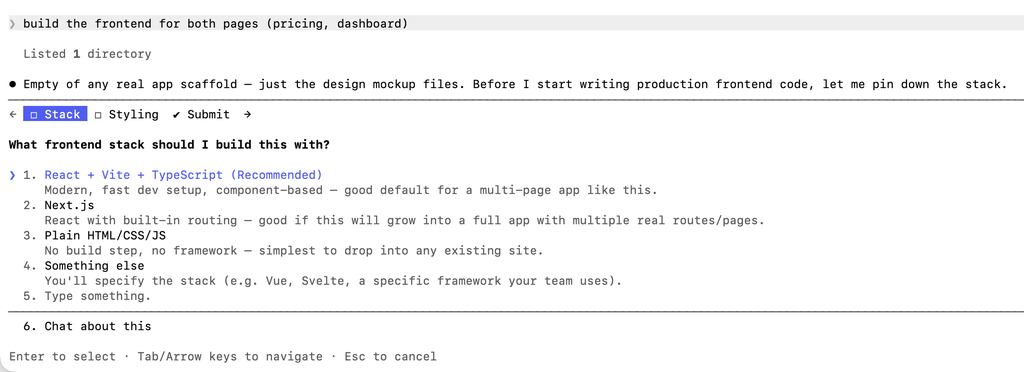
Only after this decision is made does Claude Code write the actual application code for both pages—based on the previously confirmed design artifacts, not on a new interpretation of the original requirement.
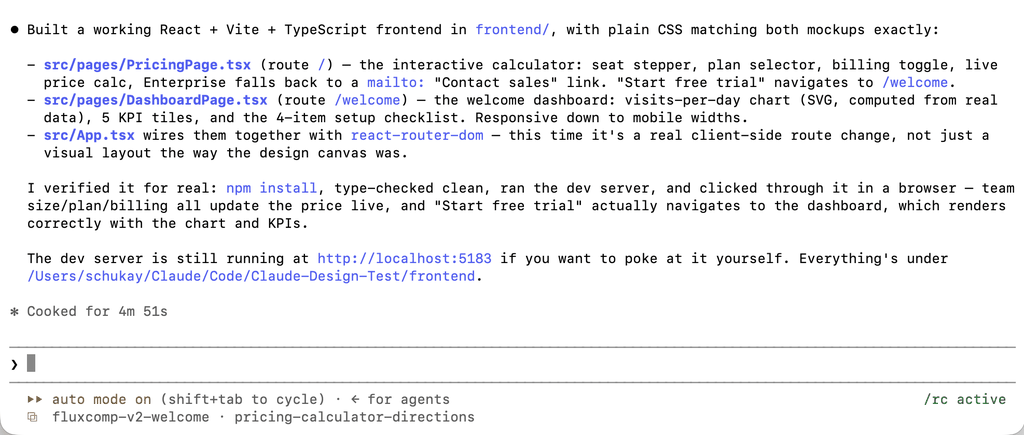
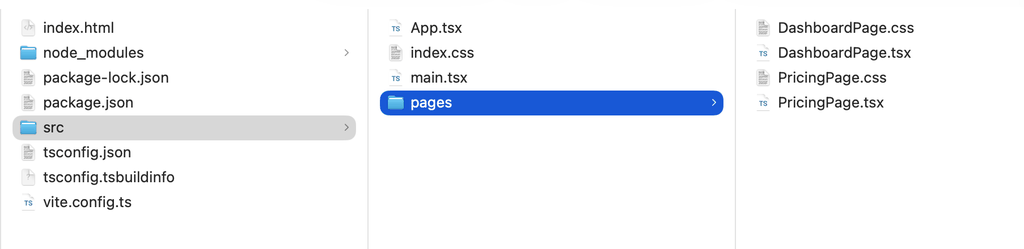
After about five minutes, Claude Code provides a summary of what has actually been created: a PricingPage.tsx for the / route with a working seat selector, seat plan selection, a billing toggle, and live price calculation; a DashboardPage.tsx for the /welcome route featuring the visitor chart and the five KPI tiles; and an App.tsx that connects both pages via react-router-dom for true client-side navigation. Claude Code not only wrote the code but also tested it himself: he ran `npm install`, checked the TypeScript types, started the dev server, and clicked through the pages in the browser.
Step 5: The finished front end in the browser
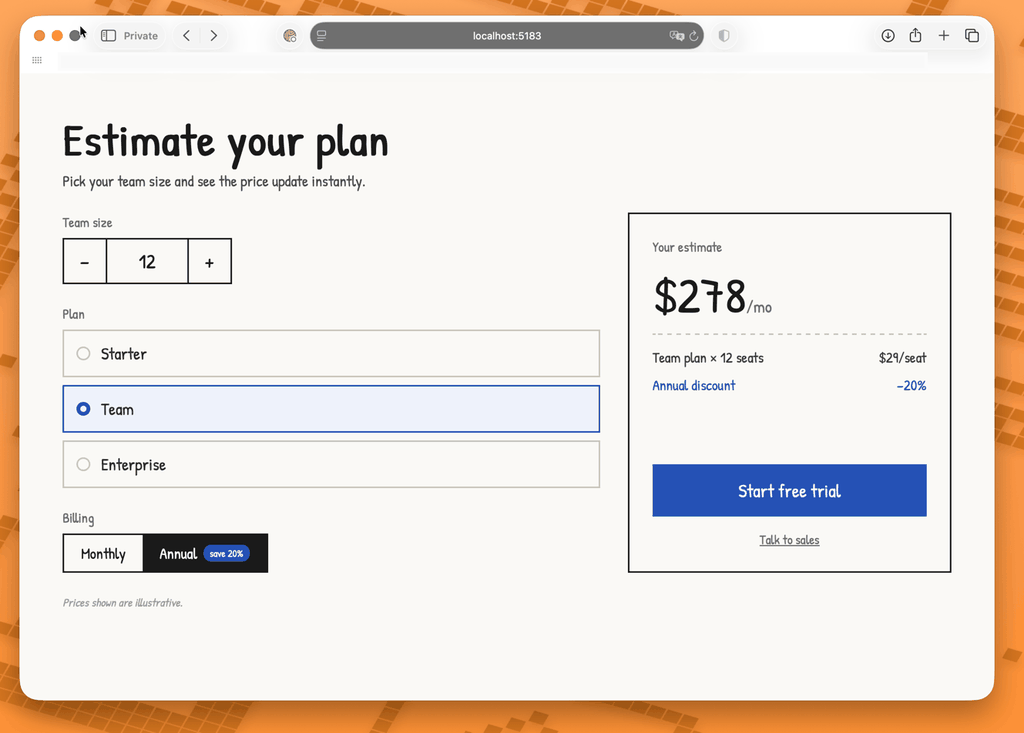
The local dev server allows you to test the result immediately. The price calculator page runs at localhost:5183 exactly according to the previously selected design direction, including a price calculated in real time:
Clicking “Start free trial” navigates you on the client side to the second page at localhost:5183/welcome —the FluxComp V2 dashboard from Step 3, now as a functional route instead of a static design:
Claude Code /design vs. traditional UI workflow: The key advantages
- Design decisions before coding: Layout, colors, and hierarchy are finalized before Claude Code writes production-ready code—this reduces rework.
- Multiple options at a glance: A single prompt delivers several comparable design directions instead of a single suggestion.
- No switching between tools: The entire process, from design to implementation, takes place within a single Claude Code session, without the need to export or import between a separate design tool and the editor.
- Targeted Queries Instead of Guessing: Claude Code actively asks about the prototype type, design direction, and front-end stack, rather than making assumptions.
- Direct handoff to code: The confirmed artifact becomes the concrete target for implementation, without any need to manually transfer design specs.
- Proven technology behind the scenes: The editor is based on Claude Design and the Artifacts runtime—not an experimental new development, but established building blocks.
- Self-tested code: Claude Code installs dependencies, checks types, and navigates through the result in the browser before marking it as complete.
Limitations of the /design command you should be aware of
/design is an Early Preview, so there are still some issues to be resolved:
- The command uses noticeably more tokens than a normal coding request—it’s not currently worth it for small UI adjustments.
- Designs must be confirmed or saved to proceed to the build phase.
- A match with your existing design system isn’t automatically guaranteed—explicitly reference your component library in the prompt if consistency is important.
- The exact plan requirements and rollout conditions for /design have not yet been fully documented at this time.
Claude Code /design: Frequently Asked Questions (FAQ)
How much does the /design command cost in Claude Code?
There is no separate price tag: /design is included with your existing Claude Code subscription. The underlying Claude Design feature is available for the Pro, Max, Team, and Enterprise plans; tokens used count toward your subscription limit, and additional usage is available as an option. The exact terms and conditions specifically for /design in Claude Code have not yet been fully published during the Early Preview.
How do I install the /design feature?
There is no separate installation. Simply update to the latest version of Claude Code: run ` claude update` in the terminal, use the automatic update for native installations, or run ` brew upgrade claude-code ` with Homebrew.
What is the difference between Claude Design and the /design command?
Claude Design is a standalone Anthropic Labs product for designs, prototypes, slides, and one-pagers, built on a vision model from Claude. The /design command brings the Artifact Editor from Claude Design directly into a Claude Code session—for UI designs that are then turned into code within the same workflow, as shown in the example above with the price calculator and dashboard.
Can I design multiple pages in succession using /design?
Yes. In the example shown, a price calculator is created first, followed by the corresponding next page in the same session using a second /design command. Claude Code draws on the context of the previous conversation, allowing subsequent pages to flow thematically.
Does /design work with my existing design system?
Claude Code analyzes your codebase, but an automatic match to your design system isn’t guaranteed in the current preview. Explicitly name your component library and design tokens in the prompt if you want the result to be consistent with your existing UI.
Learn more: Claude Code /design
- Announcement by Nate Parrott (Anthropic) on X —the original post announcing the early preview of the /design command.
- Claude Design – Anthropic Labs – the official announcement of the design tool on which /design is technically based.
- Claude Code Documentation – Overview of installation, user interfaces, and all features of Claude Code.
- Full Tutorial: From Idea to App with Claude Design and Claude Code (YouTube) – A video walkthrough showing how a project progresses from the initial idea through Claude Design to implementation in Claude Code.
- Design with Claude Code: The Designer’s Guide (YouTube) – An introduction from a design perspective on how to use Claude Code for UI work.
Conclusion
Using the examples of a price calculator and a dashboard, we can see exactly what the /design command in Claude Code changes: Instead of writing code directly, the process first generates several comparable designs, followed by a deliberate design decision, and only then is the frontend code generated—including a query to determine the appropriate tech stack. The end result is no longer a static mockup, but a working React application with real navigation between the two pages—which Claude Code has installed, tested, and navigated through itself. For multi-page UI tasks, the command can be used multiple times in a row within the same session. As an early preview, the feature isn’t yet fully polished in every detail; in particular, you’ll need to help it along when it comes to adhering to your own design system. It’s already worth testing for new screens and features.
You can find out more about Claude Code in the comparison between Claude Chat, Cowork, and Code, in the guide to MCP server installation, and in the article on Vibe Coding vs. Spec-Driven Development. Our article on Claude Sonnet 5 provides an overview of the current model behind it.